概要
実は触っことがなかったのでチュートリアルを消化してみました
簡単な Hello world からモデルの定義、テンプレートの利用など基本的な使い方を紹介しているようです
環境
- macOS 11.7.10
- Python 3.11.6
- Django 5.0.1
インストール
プロジェクト作成
- pipenv run django-admin startproject mysite
- cd mysite
以下作業は pipenv + mysite 配下のディレクトリで行っていきます
Hello world
チュートリアルでは投票アプリを作るようなのでそのまま指示に従ってアプリを作成します
Hello world を返却するビューを作成します
from django.http import HttpResponse


def index(request):
    return HttpResponse(b"Hello world.")
ビューをルーティングに追加します
from django.urls import path

from . import views

urlpatterns = [
    path("", views.index, name="index")
]
大本のサイトから投票アプリを参照します
from django.contrib import admin
from django.urls import include, path

urlpatterns = [
    path("polls/", include("polls.urls")),
    path("admin/", admin.site.urls),
]
あとはアプリを起動して
にアクセスして Hello world のテキスト返ってくることを確認します
データベースマイグレート
Operations to perform:
  Apply all migrations: admin, auth, contenttypes, sessions
Running migrations:
  Applying contenttypes.0001_initial... OK
  Applying auth.0001_initial... OK
  Applying admin.0001_initial... OK
  Applying admin.0002_logentry_remove_auto_add... OK
  Applying admin.0003_logentry_add_action_flag_choices... OK
  Applying contenttypes.0002_remove_content_type_name... OK
  Applying auth.0002_alter_permission_name_max_length... OK
  Applying auth.0003_alter_user_email_max_length... OK
  Applying auth.0004_alter_user_username_opts... OK
  Applying auth.0005_alter_user_last_login_null... OK
  Applying auth.0006_require_contenttypes_0002... OK
  Applying auth.0007_alter_validators_add_error_messages... OK
  Applying auth.0008_alter_user_username_max_length... OK
  Applying auth.0009_alter_user_last_name_max_length... OK
  Applying auth.0010_alter_group_name_max_length... OK
  Applying auth.0011_update_proxy_permissions... OK
  Applying auth.0012_alter_user_first_name_max_length... OK
  Applying sessions.0001_initial... OK
デフォルトは SQLite のようです
mysite/settings.py に記載してある INSTALLED_APPS にあるアプリをマイグレートするようです
実際にテーブルの一覧はこんな感じでした
SQLite version 3.32.3 2020-06-18 14:16:19
Enter ".help" for usage hints.
sqlite> select name from sqlite_master where type = 'table';
django_migrations
sqlite_sequence
auth_group_permissions
auth_user_groups
auth_user_user_permissions
django_admin_log
django_content_type
auth_permission
auth_group
auth_user
django_session
モデルの作成
データベースのモデルを定義します
このあとこれを使って再度マイグレーションしテーブルを作成します
import datetime

from django.db import models
from django.utils import timezone


class Question(models.Model):
    question_text = models.CharField(max_length=200)
    pub_date = models.DateTimeField("date published")

    def __str__(self):
        return self.question_text

    def was_published_recently(self):
        return self.pub_date >= timezone.now() - datetime.timedelta(days=1)


class Choice(models.Model):
    question = models.ForeignKey(Question, on_delete=models.CASCADE)
    choice_text = models.CharField(max_length=200)
    votes = models.IntegerField(default=0)

    def __str__(self):
        return self.choice_text
__str__ などのメソッドはあとで追加することになるので先に実装しています
polls の設定を追加します
mysite/settings.py は長いので変更部分のみ記載しています
INSTALLED_APPS に PollsConfig を追加します
INSTALLED_APPS = [
    "polls.apps.PollsConfig",
    "django.contrib.admin",
    "django.contrib.auth",
    "django.contrib.contenttypes",
    "django.contrib.sessions",
    "django.contrib.messages",
    "django.contrib.staticfiles",
]
アプリ用のテーブルの作成
Migrations for 'polls':
  polls/migrations/0001_initial.py
    - Create model Question
    - Create model Choice
マイグレーションファイルが作成されることを確認します
SQLAlchemy のようにマイグレーションファイルが微妙な場合は自分で修正しましょう
マイグレーションファイルが作成できたら実際にマイグレーションしてみます
sqlmigrate コマンドで事前に実行される SQL を確認することもできます
マイグレートコマンドは先程と同じです
Operations to perform:
  Apply all migrations: admin, auth, contenttypes, polls, sessions
Running migrations:
  Applying polls.0001_initial... OK
実際にテーブルを確認すると polls_question と polls_choice テーブルが追加されています
sqlite> .schema polls_question
CREATE TABLE IF NOT EXISTS "polls_question" ("id" integer NOT NULL PRIMARY KEY AUTOINCREMENT, "question_text" varchar(200) NOT NULL, "pub_date" datetime NOT NULL);
sqlite> .schema polls_choice
CREATE TABLE IF NOT EXISTS "polls_choice" ("id" integer NOT NULL PRIMARY KEY AUTOINCREMENT, "choice_text" varchar(200) NOT NULL, "votes" integer NOT NULL, "question_id" bigint NOT NULL REFERENCES "polls_question" ("id") DEFERRABLE INITIALLY DEFERRED);
CREATE INDEX "polls_choice_question_id_c5b4b260" ON "polls_choice" ("question_id");
おまけ: 作成したモデルをコンソールから操作する
rails console のような機能があり作成したモデルを操作することができるようなので試してみます
これで作成した Question や Choice モデルが扱えます
操作方法は公式にあるので割愛しますが簡単なデバッグが挙動の確認、テーブル情報の確認をしたいときには便利かなと思います
テスト用のデータなども登録しているので一通り流しておきましょう
from polls.models import Question, Choice
Question.objects.all()
from django.utils import timezone
q = Question(question_text="What's new?", pub_date=timezone.now())
q.save()
q.id
q.question_text
q.pub_date
q.question_text = "What's up?"
q.save()
Question.objects.all()

q = Question.objects.get(pk=1)
q.choice_set.create(choice_text="Not much", votes=0)
q.choice_set.create(choice_text="The sky", votes=0)
c = q.choice_set.create(choice_text="Just hacking again", votes=0)
c = q.choice_set.filter(choice_text__startswith="Just hacking")
c.delete()
admin ツールを使う
django には標準で admin 用のツールがありデータの確認や登録がアプリとは別で行うことができるようになっています
ユーザ名、パスワード、メールアドレスの入力を求められるので入力しましょう
サーバを起動し localhost:8000/admin/ にアクセスすると管理画面に遷移します
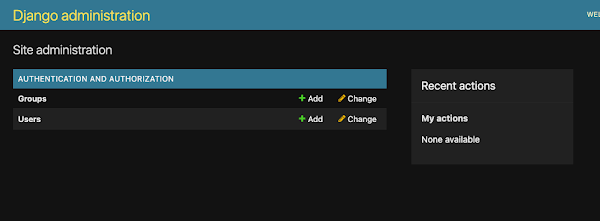
from django.contrib import admin

from .models import Question

admin.site.register(Question)
これで再度リロードすると polls アプリのオブジェクト (データベース) も扱うことができます
適当に登録、更新、削除など試してみると良いかなと思います
デフォルトで更新履歴も管理してくているようです
ビューを追加する
アプリの機能を追加していきます
from django.http import HttpResponse


def index(request):
    return HttpResponse(b"Hello world.")


def detail(request, question_id):
    return HttpResponse(f"You're looking at question {question_id}.")


def results(request, question_id):
    return HttpResponse(f"You're looking at the results of question {question_id}.")


def vote(request, question_id):
    return HttpResponse(f"You're voting on question {question_id}.")
from django.urls import path

from . import views

app_name = "polls"
urlpatterns = [
    path("", views.index, name="index"),
    path("<int:question_id>/", views.detail, name="detail"),
    path("<int:question_id>/results/", views.results, name="results"),
    path("<int:question_id>/vote/", views.vote, name="vote"),
]
テンプレートの追加
少し独特なパスですが以下のようにすることで自動で読み込んでくれます
html ファイルで構文は j2 です (たぶん)
- mkdir -p polls/templates/polls/
- vim polls/templates/polls/index.html
url という特殊なタグが使えるようです
urls.py
の name とリンクしているようです
{% if latest_question_list%}
<ul>
{% for question in latest_question_list %}
  <li><a href='{% url "detail" question.id %}'>{{ question.question_text }}</a>
{% endfor %}
</ul>
{% else %}
<p>No polls are available.</p>
{% endif %}
- vim polls/templates/polls/detail.html
<h1>{{ question.question_text }}</h1>
<ul>
{% for choice in question.choice_set.all %}
  <li>{{ choice.choice_text }}</li>
{% endfor %}
</ul>
ビュー側です
django.shortcuts モジュールを使うとテンプレートの呼び出しやエラーハンドリングを簡単に書けるようです
from django.http import HttpResponse
from django.shortcuts import get_object_or_404, render

from .models import Question


def index(request):
    latest_question_list = Question.objects.order_by("-pub_date")[:5]
    context = {
        "latest_question_list": latest_question_list,
    }
    return render(request, "polls/index.html", context)


def detail(request, question_id):
    question = get_object_or_404(Question, pk=question_id)
    return render(request, "polls/detail.html", { "question": question })


def results(request, question_id):
    return HttpResponse(f"You're looking at the results of question {question_id}.")


def vote(request, question_id):
    return HttpResponse(f"You're voting on question {question_id}.")
フォームの作成
先程作成したテンプレートを改良して form post できるようにします
- vim polls/templates/polls/detail.html
<form action="{% url 'polls:vote' question.id %}" method="post">
{% csrf_token %}
<fieldset>
  <legend><h1>{{ question.question_text }}</h1></legend>
  {% if error_message %}<p><strong></strong></p>{% endif %}
  {% for choice in question.choice_set.all %}
    <input type="radio" name="choice" id="choice{{ forloop.counter }}" value="{{ choice.id }}">
    <label for="choice{{ forloop.counter }}">{{ choice.choice_text }}</label>
    <br>
  {% endfor %}
</fieldset>
<input type="submit" value="Vote">
</form>
結果を表示するテンプレートも作成します
- vim polls/templates/polls/results.html
<h1>{{ question.question_text }}</h1>
<ul>
{% for choice in question.choice_set.all%}
  <li>{{ choice.choice_text }} -> {{ choice.votes }} vote{{ choice.votes | pluralize }}</li>
{% endfor %}
</ul>

<a href="{% url 'polls:detail' question.id %}">Vote again?</a>
POST が受け取れるように vote 関数を変更します
フォームデータには request.POST でアクセスするようです
from django.http import HttpResponseRedirect
from django.shortcuts import get_object_or_404, render
from django.urls import reverse

from .models import Question


def index(request):
    latest_question_list = Question.objects.order_by("-pub_date")[:5]
    context = {
        "latest_question_list": latest_question_list,
    }
    return render(request, "polls/index.html", context)


def detail(request, question_id):
    question = get_object_or_404(Question, pk=question_id)
    return render(request, "polls/detail.html", {"question": question})


def results(request, question_id):
    question = get_object_or_404(Question, pk=question_id)
    return render(request, "polls/results.html", {"question": question})


def vote(request, question_id):
    question = get_object_or_404(Question, pk=question_id)
    try:
        selected_choice = question.choice_set.get(pk=request.POST["choice"])
    except (KeyError, Choice.DoesNotExist):
        return render(
            request,
            "polls/detail.html",
            {"question": question, "error_message": "You didn't select a choice"},
        )
    else:
        selected_choice.votes += 1
        selected_choice.save()
        return HttpResponseRedirect(reverse("polls:results", args=(question.id,)))
汎用ビュー化
ビューを少しリファクリングします
今まで関数で定義していたビューをクラス化します
汎用ビューはビューで使用するモデルとテンプレートが決まっている場合に簡潔にビューを定義できる機能です
from django.http import HttpResponseRedirect
from django.shortcuts import get_object_or_404, render
from django.urls import reverse
from django.views import generic

from .models import Question


class IndexView(generic.ListView):
    template_name = "polls/index.html"
    context_object_name = "latest_question_list"

    def get_queryset(self):
        return Question.objects.order_by("-pub_date")[:5]


class DetailView(generic.DetailView):
    model = Question
    template_name = "polls/detail.html"


class ResultsView(generic.DetailView):
    model = Question
    template_name = "polls/results.html"


def vote(request, question_id):
    question = get_object_or_404(Question, pk=question_id)
    try:
        selected_choice = question.choice_set.get(pk=request.POST["choice"])
    except (KeyError, Choice.DoesNotExist):
        return render(
            request,
            "polls/detail.html",
            {"question": question, "error_message": "You didn't select a choice"},
        )
    else:
        selected_choice.votes += 1
        selected_choice.save()
        return HttpResponseRedirect(reverse("polls:results", args=(question.id,)))
URL マッピング側も関数ではなくクラスを参照するように書きえます
汎用ビューの場合には pk というパスパラメータが自動的に使用されるので question_id -> pk に変更します
from django.urls import path

from . import views

app_name = "polls"
urlpatterns = [
    path("", views.IndexView.as_view(), name="index"),
    path("<int:pk>/", views.DetailView.as_view(), name="detail"),
    path("<int:pk>/results/", views.ResultsView.as_view(), name="results"),
    path("<int:question_id>/vote/", views.vote, name="vote"),
]
テストを書く
django.test.TestCase のサブクラスとして書くようです
テストファイルのアプリ配下に書きます
import datetime

from django.test import TestCase
from django.utils import timezone

from .models import Question


class QuestionModelTests(TestCase):
    def test_was_published_recently_with_future_question(self):
        time = timezone.now() + datetime.timedelta(days=30)
        future_question = Question(pub_date=time)
        self.assertIs(future_question.was_published_recently(), False)

    def test_was_published_recently_with_old_question(self):
        time = timezone.now() + datetime.timedelta(days=1, seconds=1)
        old_question = Question(pub_date=time)
        self.assertIs(old_question.was_published_recently(), False)

    def test_was_published_recently_with_recent_question(self):
        time = timezone.now() - datetime.timedelta(hours=23, minutes=59, seconds=59)
        recent_question = Question(pub_date=time)
        self.assertIs(recent_question.was_published_recently(), True)
テストは失敗します
バグがあるので Question モデルの was_published_recently を修正します
import datetime

from django.db import models
from django.utils import timezone


class Question(models.Model):
    question_text = models.CharField(max_length=200)
    pub_date = models.DateTimeField("date published")

    def __str__(self):
        return self.question_text

    def was_published_recently(self):
        now = timezone.now()
        return now - datetime.timedelta(days=1) <= self.pub_date <= now


class Choice(models.Model):
    question = models.ForeignKey(Question, on_delete=models.CASCADE)
    choice_text = models.CharField(max_length=200)
    votes = models.IntegerField(default=0)

    def __str__(self):
        return self.choice_text
これで再度テストを実行すると OK になります
以下続きますが省略します
やってることはそれほど難しくないので興味があれば続けてやってみるよ良いかなと思います
ビューのテスト
テストクライアントがあるのでそれを使います
デザインの追加
css や画像を追加します
Admin のカスタマイズ
リレーション先の参照やフォームのカスタマイズをします
デバッグツール
django-debug-toolbar を使います
自分のアプリのパッケージ化
Pypi で公開できるようにパッケージ化します
感想
- とにかくドキュメントが充実している
- Ruby で言うところの rails
- django が提供しているモデルやツールを使う感じなので DSL という感じが強かった
- ディレクトリ構成が強制されるのは良いことだと思うが少し変な構造な感じもした (tests や admin など)
- チュートリアルのコードはコピペで横着せず全部自分でタイプしながらやると力になる
- admin ツールが標準装備なので便利 (テストデータの登録や確認など)
- チュートリアルだと pyright のタイプエラーが結構出る
- pydantic との連携が微妙そう (アダプタ的なのはあるがあまりメンテされてなさそう)
最後に
途中までですが django のチュートリアルを試してみました
まさにフレームワークという感じで書き方や作り方はルールに則って進める必要があります
簡単に構築したい場合にはおすすめなのかもしれませんが如何せんブラックボックスが多いのと独特な機能や記法を使う部分も多いので Python 全般というよりかは django という機能や言語を学んでいるという感覚が強いかなと思います
参考サイト


